Module 4 • Lesson 3🌫️ Atmosphere & the Unifying Grade
The Module 4 deliverable. Even a perfectly placed, perfectly lit composite can still look like separate photos sitting near each other. Atmosphere adds depth, and a single grade laid over everything is the final handshake that makes disparate elements agree they were shot together.
📚 What You'll Learn
By the end of this lesson, you will be able to:
- Use atmospheric perspective (haze, fading contrast) to build depth
- Add fog, light rays, and dust that sit between elements, not just on top
- Lay a single unifying grade over the whole stack with one adjustment
- Understand why one grade over everything beats grading each piece
- Deliver a finished, cohesive advertising-style key visual
⏱️ Estimated Time: 55 minutes
🎯 Project (Module 4 deliverable): A finished composite key visual — placed, lit, and now given depth and one grade so it reads as a single photograph.
In This Lesson
👤 The Goal: One Photograph
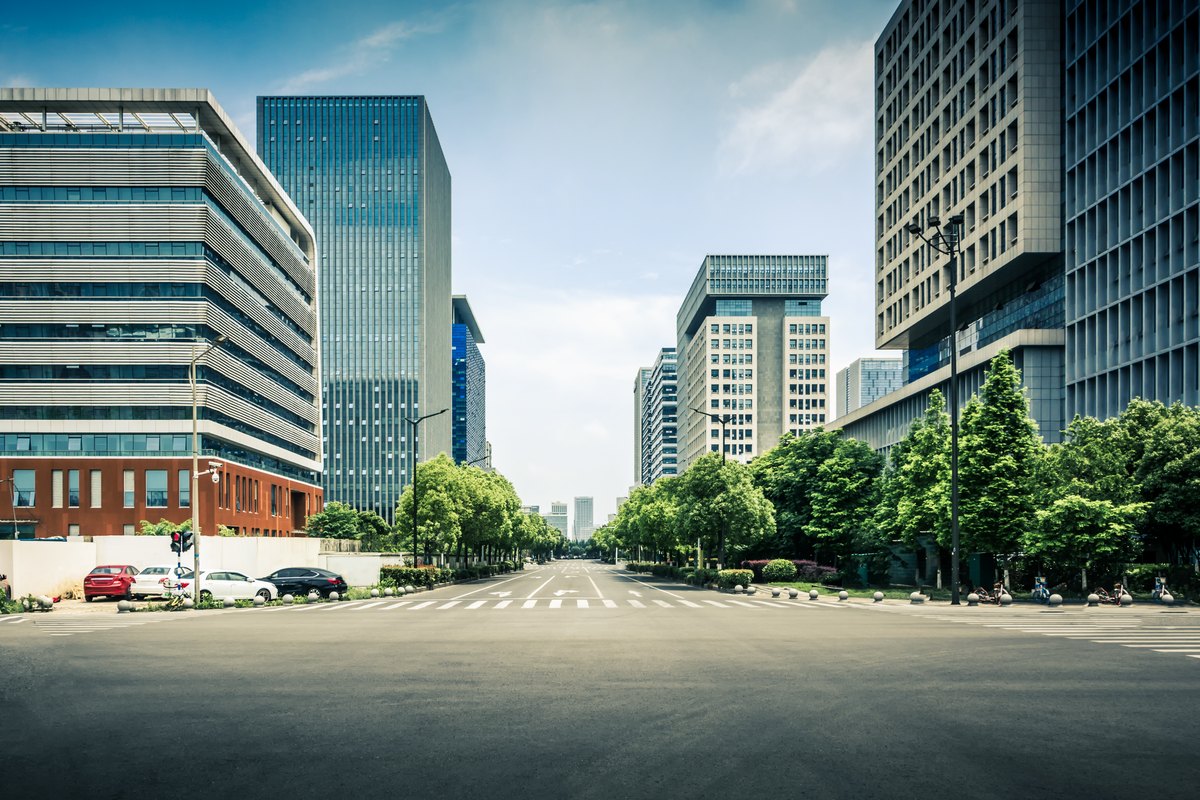
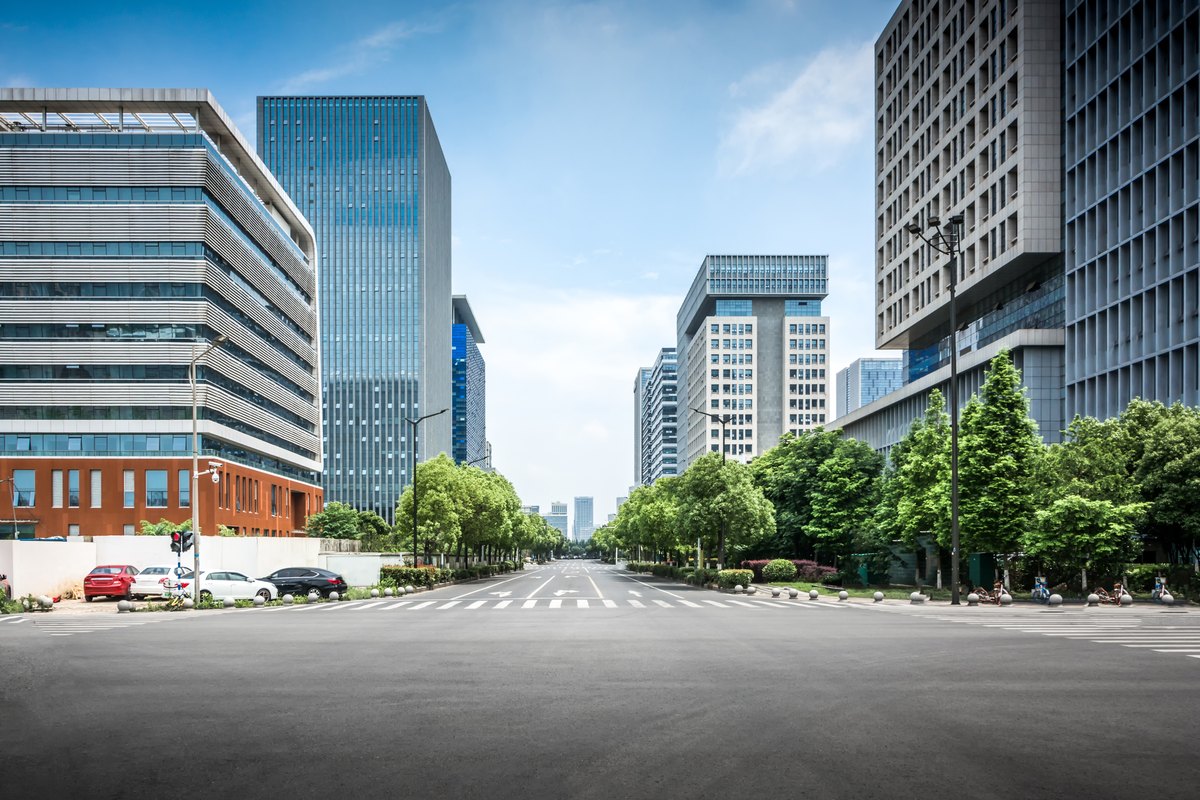
On the right, a flat, neutral daytime scene — technically fine, emotionally nothing, and the kind of clinical light that makes composited elements stand apart. On the left, one unifying grade: cooler shadows, warmer highlights, richer contrast. Suddenly it is a frame, and anything dropped into it inherits the same mood. Drag the handle:
🧠 Mental Model: Distance Has a Look
Atmospheric perspective is the everyday fact that the farther something is, the more the air between you and it washes it out: contrast drops, colors desaturate and shift toward the sky's color (usually cooler and lighter), and edges soften. Mountains on the horizon are pale blue for this reason. Our brains read that fade as distance automatically.
So depth in a composite is not only about size and placement — it is about reducing contrast and adding haze on the far elements. A background element that is as crisp and saturated as the foreground will always feel pasted forward. Push it back with a little atmosphere.
🎨 The Unifying Grade
The magic move is simple: put one grade at the very top of the layer stack so it affects every element at once. A Color Lookup (LUT), a Gradient Map on low opacity, or a Curves + Color Balance group — it does not matter which, as long as a single set of adjustments touches the whole frame. Shared color is shared identity; the eye reads elements under one grade as belonging to one photo.
⚠️ Unify last, grade once
If you grade each element separately you will chase your tail forever. Get every piece to neutral and correct first, then apply one grade on top. One dial to turn beats twenty, and it is the only way to keep a large composite coherent.
🌁 Adding Atmosphere
Atmosphere is what fills the space between your elements, and it is the difference between "layers stacked" and "a world." A few reliable moves:
- Depth haze: a new layer, soft low-opacity brush in the sky/scene color, painted over the far elements to push them back.
- Light rays / god rays: paint streaks from the light source on a Screen layer, blur, mask to the shafts. Ties the light into the air.
- Floating particles: subtle dust or mist on a Screen layer gives the light something to travel through.
- Glow / bloom: a merged copy, blurred, on Screen at low opacity makes highlights bleed like a real lens.
✅ Atmosphere goes between, grade goes on top
Place haze and rays above the elements they affect but below the final grade. That way distant elements get their haze, and then the single grade still unifies the entire frame, atmosphere included.
🛠️ Guided Build: Depth & Grade
Open your lit, shadowed composite from Lesson 4.2.
Step 1: Set depth by contrast · 10 min
- Identify your far, mid, and near elements. On the far ones, add a Curves that lowers contrast and lifts the blacks slightly, with a touch of the sky color. Clip it (Ctrl/⌘ + Alt/⌥ + G) when the far element is its own layer; when it is part of the background photo, mask the Curves to the distant area instead, since clipping to the background would change the whole scene.
- Keep the nearest element the crispest and most saturated. The contrast falloff alone reads as distance.
Step 2: Paint the atmosphere · 12 min
- New layer (Normal mode) above the far elements but below your subject and its shadows: soft brush, scene/sky color, very low flow, glaze haze over the background so it recedes.
- Optional: a Screen layer for light rays from the source, blurred and masked to shafts; a whisper of particles for air.
Step 3: The unifying grade · 10 min
- At the top of the stack add your grade: a Color Lookup LUT, or a Curves + Color Balance group (cool the shadows, warm the highlights, add gentle contrast).
- Toggle it and watch every element lock together. Pull its opacity back until it is strong but not garish.
Step 4: Finish and deliver · 8 min
- Add a subtle vignette to hold the eye, a touch of glow on the highlights, and grain to bind everything to one film stock.
- Save the layered
m4-key-visual.psd, then make a flat copy with Image ▸ Duplicate (tick Duplicate Merged Layers Only), Edit ▸ Convert to Profile ▸ sRGB, and File ▸ Export ▸ Export As. Module 4 deliverable: a cohesive key visual that reads as one photograph. 🏆
✅ Project Completion Checklist (Module 4 deliverable)
- ☐ Element placed with correct perspective & scale (4.1)
- ☐ Element lit, with contact and cast shadows (4.2)
- ☐ Depth set by lowering contrast / adding haze on far elements
- ☐ Atmosphere (haze, optional rays/particles) between elements
- ☐ One unifying grade over the whole stack
- ☐ Vignette + grain; exported as a finished key visual
🧗 Now You: Solo Variation
🌟 Your challenge
- Grade one composite three ways — warm blockbuster, cool thriller, faded indie — and notice the story each grade tells with the same pixels.
- Build a deep scene (foreground subject, midground, far skyline) and prove the depth using contrast and haze alone, before any grade.
- Save your unifying grade as a LUT (Lesson 2.2) and reuse it across three different composites to give a series one visual identity.
Going further: composite a subject into a scene shot at a completely different time of day, and use only atmosphere + grade to make them agree. That is the exam every senior compositor passes.
🍳 Recipe Card: Atmosphere & Grade
Depth, then one grade
- Lower contrast + add sky color on far elements (atmospheric perspective)
- Glaze haze between elements; optional rays / particles on Screen
- Keep atmosphere above the far elements, below the grade
- One unifying grade (Color Lookup / Curves) on top of everything
- Vignette + glow + grain, then flatten & export to sRGB
Mantra: correct every piece to neutral, then let one grade make them a family.
📓 Learning Journal
Add to your journal after this lesson:
- Key concepts you learned
- Techniques that clicked for you
- Questions or confusion points to revisit
- Ideas you want to try
- Your progress and feelings about learning this
✍️ This lesson's prompt: Pick a film still you love. Describe its grade in words (where are the shadows pushed, where the highlights?) and where atmosphere creates its depth. Then try to rebuild that grade on one of your own images.
📝 Module 4 Summary
🎓 Key Takeaways
- Perspective first: share one horizon, place by ground contact, match the lens.
- Light & shadow next: match direction/hardness/color, then anchor with contact and cast shadows.
- Atmosphere builds depth: lower contrast and add haze on far elements.
- One unifying grade over the whole stack makes separate photos read as one frame.
🎉 What You've Accomplished — Across All of Module 4
You can now take elements shot at different times, in different light, on different lenses, and assemble them into a single believable image: matched in geometry (4.1), married in light and shadow (4.2), and unified by atmosphere and grade (4.3). Commercial compositing is one of the highest-paid Photoshop skills, and you now own its full pipeline.
❓ Common Questions at This Stage
Should I add atmosphere or grade first?
Atmosphere first, grade last, and what really matters is where each sits in the layer stack, not when you made it. Atmosphere sets the depth relationships between elements, so it goes above the far elements; the grade goes at the very top so it unifies the whole frame, atmosphere included. A haze layer placed above the grade would escape it and look pasted on.
My composite still looks "off" after all this. What did I miss?
Run the checklist in order: horizon, scale, lens, light direction, shadow, contact shadow, depth/haze, grade. Ninety percent of "off" composites fail at scale or the missing contact shadow. Fix those two before blaming the grade.
🔭 Looking Ahead
You have finished making single images extraordinary. The Commercial Work tier now turns to producing at scale. Module 5 — Design Systems & Type covers type systems, Smart-Object templates, and building a whole campaign from one master file.
✅ Before the Next Module
- Complete one composite through the full 4.1 → 4.2 → 4.3 pipeline and keep the layered file.
- Save your unifying grade as a reusable LUT.
- Write your Learning Journal entry.
📚 Additional Resources
🌟 Encouragement for the Journey
Compositing is where technique becomes invisible and craft becomes storytelling. You just learned to build worlds that never stood in front of a lens — and to make people believe them. That is a genuinely rare skill. Take a breath, then let's turn it into repeatable, sellable systems.